
GraphRAG 정확도를 높이기 위한 엔터티 중복 제거 및 사용자 지정 검색 방법

배경
Property Graph Index는 LlamaIndex에 정말 멋진 기능 추가이자, 기존의 Knowledge Graph 통합을 한 단계 업그레이드한 버전이라고 할 수 있어요. 이제 데이터 표현 방식이 조금 달라졌는데요. 이전에는 그래프가 트리플 형태로 표현되었다면, 이제는 label이 붙은 `Node`와 선택적으로 `Node` 속성을 가진 제대로 된 Property Graph 통합을 제공하죠.
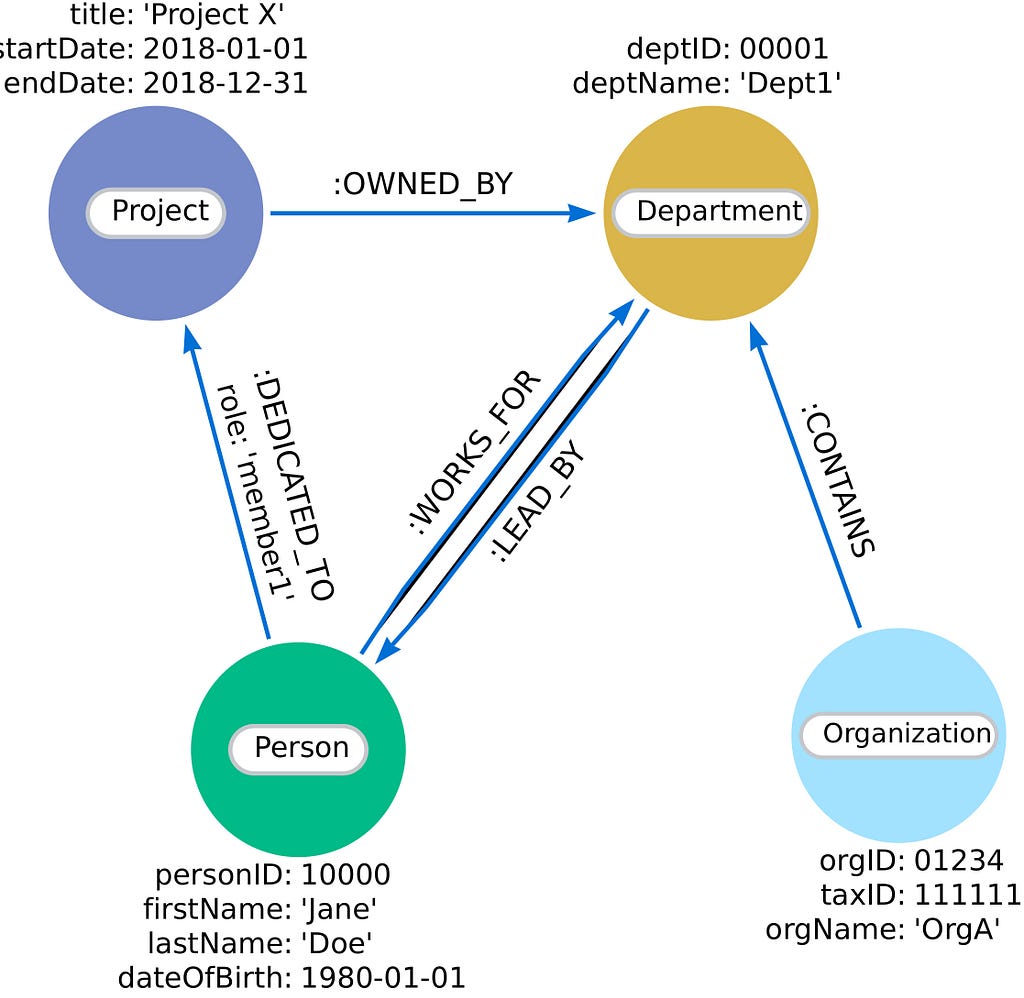
각 `Node`에는 개인, 조직, 프로젝트 또는 부서와 같은 유형을 나타내는 label이 지정돼요. 그리고 `Node`와 `Relationship`은 이 예시에서 보이는 것처럼 생년월일, 프로젝트 시작 및 종료 날짜 등과 같은 관련 세부 정보를 `Node` 속성으로 저장할 수도 있답니다.
Property Graph Index는 모듈식으로 설계되었기 때문에, 하나 이상의 (맞춤형) Knowledge Graph 생성자와 검색기를 사용할 수 있어요. 덕분에 첫 번째 Knowledge Graph를 구축하거나 필요에 따라 구현을 맞춤 설정하는 데 아주 유용한 도구가 될 수 있죠.
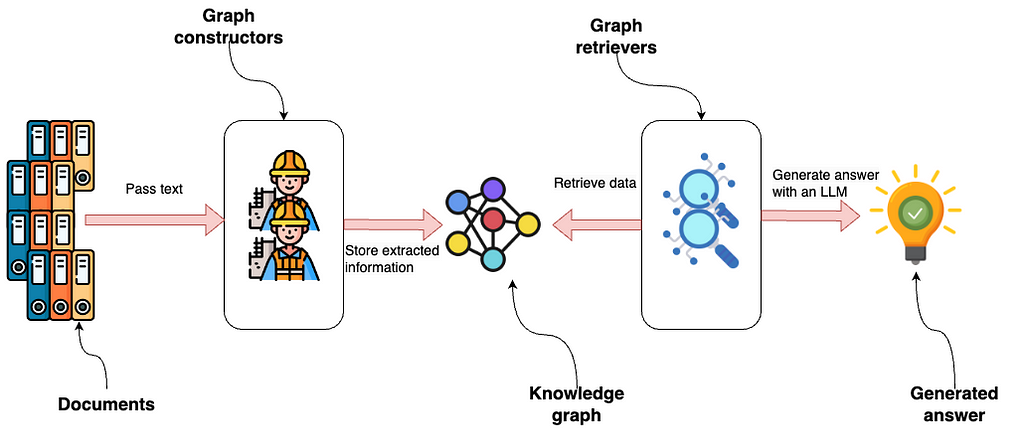
위 이미지는 그래프 생성자에 전달되는 문서부터 시작해서 LlamaIndex 내의 Property Graph 통합을 보여주고 있어요. 이러한 생성자는 구조화된 정보를 추출한 다음 Knowledge Graph에 저장하는 모듈식 구성 요소인데요. 다양한 데이터 소스 또는 추출 요구 사항에 맞춰 시스템의 유연성을 높여주는 다양한 모듈 또는 사용자 정의 모듈을 사용해서 그래프를 만들 수 있다는 점이 매력적이죠.
그다음 그래프 검색기는 Knowledge Graph에 접근해서 데이터를 검색해요. 이 단계 역시 모듈식이기 때문에 그래프 내에서 특정 유형의 데이터 또는 `Relationship`을 쿼리하도록 설계된 여러 검색기 또는 맞춤 솔루션을 사용할 수 있답니다.
LLM은 검색된 데이터를 사용해서 결과 또는 통찰력을 나타내는 답변을 생성해요. 이 흐름을 보면 전체 기능을 향상시키거나 특정 요구 사항에 맞게 조정하기 위해 각 구성 요소를 독립적으로 수정하거나 교체할 수 있는 적응성과 확장성이 뛰어난 시스템이라는 것을 알 수 있죠?
이번 블로그 포스팅에서는 다음 내용들을 알아볼 거예요.
- 스키마 기반 추출을 사용해서 Knowledge Graph 구성하기
- 텍스트 Vector Embedding과 단어 유사성 기술을 결합해서 엔터티 중복 제거 수행하기
- 사용자 정의 그래프 검색기 디자인하기
- 사용자 정의 검색기를 사용해서 질문 답변 흐름 구현하기
코드는 에서 확인할 수 있어요.
환경 설정
Neo4j를 기본 그래프 저장소로 사용할 건데요. 시작하는 가장 쉬운 방법은 무료 인스턴스를 사용하는 거예요. Neo4j AuraDB는 Neo4j 데이터베이스의 클라우드 인스턴스를 제공하거든요. 아니면 Neo4j Desktop 애플리케이션을 다운로드해서 로컬 데이터베이스 인스턴스를 설정할 수도 있어요:
from llama_index.graph_stores.neo4j import Neo4jPGStore

username="neo4j"
password="stump-inlet-student"
url="bolt://52.201.215.224:7687"

graph_store = Neo4jPGStore(
    username=username,
    password=password,
    url=url,
)
그리고 OpenAI API 키도 필요하겠죠?
import os

os.environ["OPENAI_API_KEY"] = "sk-"
데이터세트
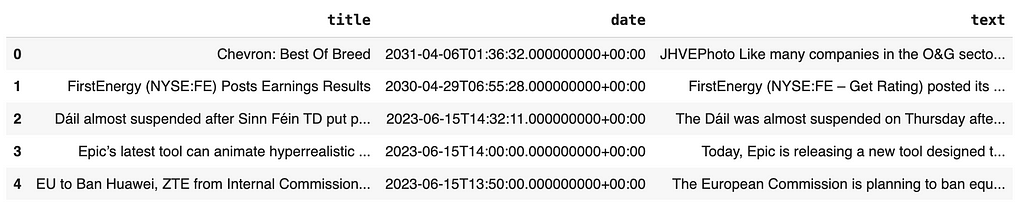
저희는 Diffbot의 샘플 뉴스 기사 데이터세트를 사용할 건데요, 제가 에 올려서 더 쉽게 접근할 수 있도록 해놨어요.
Property Graph Index는 문서와 함께 작동하므로 뉴스의 텍스트를 LlamaIndex 문서로 래핑해야 해요.
import pandas as pd
from llama_index.core import Document

news = pd.read_csv(
  "https://raw.githubusercontent.com/tomasonjo/blog-datasets/main/news_articles.csv")
documents = [Document(text=f"{row['title']}: {row['text']}") for i, row in news.iterrows()]
그래프 구성
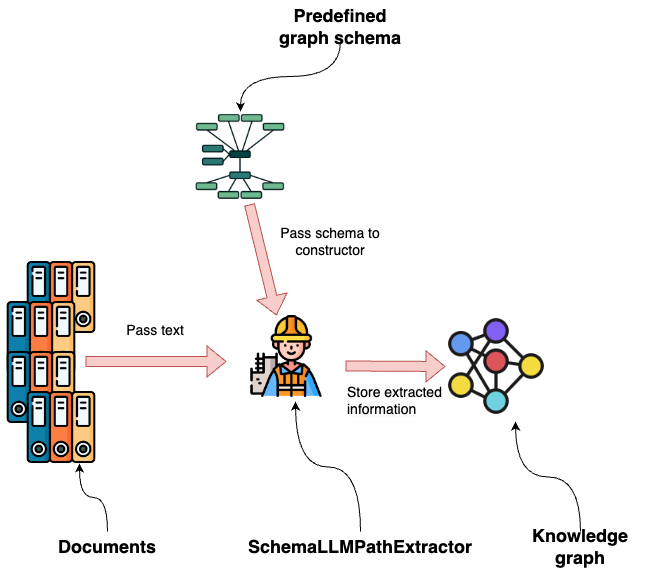
LlamaIndex는 다양한 기능을 제공하는데요, 기본 그래프 생성자를 한번 살펴보세요. 이 예에서는 SchemaLLMPath 추출기를 사용해서 문서에서 추출하려는 그래프 구조의 스키마를 정의할 수 있어요.
LLM이 추출할 `Node` 유형과 `Relationship`을 정의하는 것부터 시작해볼게요.
entities = Literal["PERSON", "LOCATION", "ORGANIZATION", "PRODUCT", "EVENT"]
relations = Literal[
    "SUPPLIER_OF",
    "COMPETITOR",
    "PARTNERSHIP",
    "ACQUISITION",
    "WORKS_AT",
    "SUBSIDIARY",
    "BOARD_MEMBER",
    "CEO",
    "PROVIDES",
    "HAS_EVENT",
    "IN_LOCATION",
]
보시다시피 우리는 사람과 조직을 중심으로 그래프 추출에 중점을 두고 있어요. 다음으로 각 `Node` 라벨과 연결된 `Relationship`을 지정할게요.
# define which entities can have which relations
validation_schema = {
    "Person": ["WORKS_AT", "BOARD_MEMBER", "CEO", "HAS_EVENT"],
    "Organization": [
        "SUPPLIER_OF",
        "COMPETITOR",
        "PARTNERSHIP",
        "ACQUISITION",
        "WORKS_AT",
        "SUBSIDIARY",
        "BOARD_MEMBER",
        "CEO",
        "PROVIDES",
        "HAS_EVENT",
        "IN_LOCATION",
    ],
    "Product": ["PROVIDES"],
    "Event": ["HAS_EVENT", "IN_LOCATION"],
    "Location": ["HAPPENED_AT", "IN_LOCATION"],
}
예를 들어, 개인은 다음과 같은 `Relationship`을 가질 수 있어요.
- WORKS_AT
- BOARD_MEMBER
- CEO
- HAS_EVENT
스키마는 약간 더 모호하고 LLM이 다양한 유형의 정보를 캡처할 수 있게 해주는 EVENT `Node` 레이블을 제외하고 매우 구체적이에요.
이제 그래프 스키마를 정의했으니 이를 그래프 스키마에 입력할 수 있어요. SchemaLLMPathExtractor를 사용해서 그래프를 구성해볼게요.
from llama_index.core import PropertyGraphIndex

kg_extractor = SchemaLLMPathExtractor(
    llm=llm,
    possible_entities=entities,
    possible_relations=relations,
    kg_validation_schema=validation_schema,
    # if false, allows for values outside of the schema
    # useful for using the schema as a suggestion
    strict=True,
)

NUMBER_OF_ARTICLES = 250

index = PropertyGraphIndex.from_documents(
    documents[:NUMBER_OF_ARTICLES],
    kg_extractors=[kg_extractor],
    llm=llm,
    embed_model=embed_model,
    property_graph_store=graph_store,
    show_progress=True,
)
이 코드는 250개의 뉴스 기사에서 그래프 정보를 추출하지만 원하는 대로 숫자를 조정할 수 있어요. 총 2,500개의 기사가 있답니다.
GPT-4o를 사용하면 250개의 기사를 추출하는 데 약 7분이 소요돼요. 하지만 병렬화를 통해 프로세스를 가속화할 수 있죠. num_workers 매개변수를 활용하면 돼요.
저장된 내용을 검사하기 위해 작은 하위 그래프를 시각화할 수 있어요.
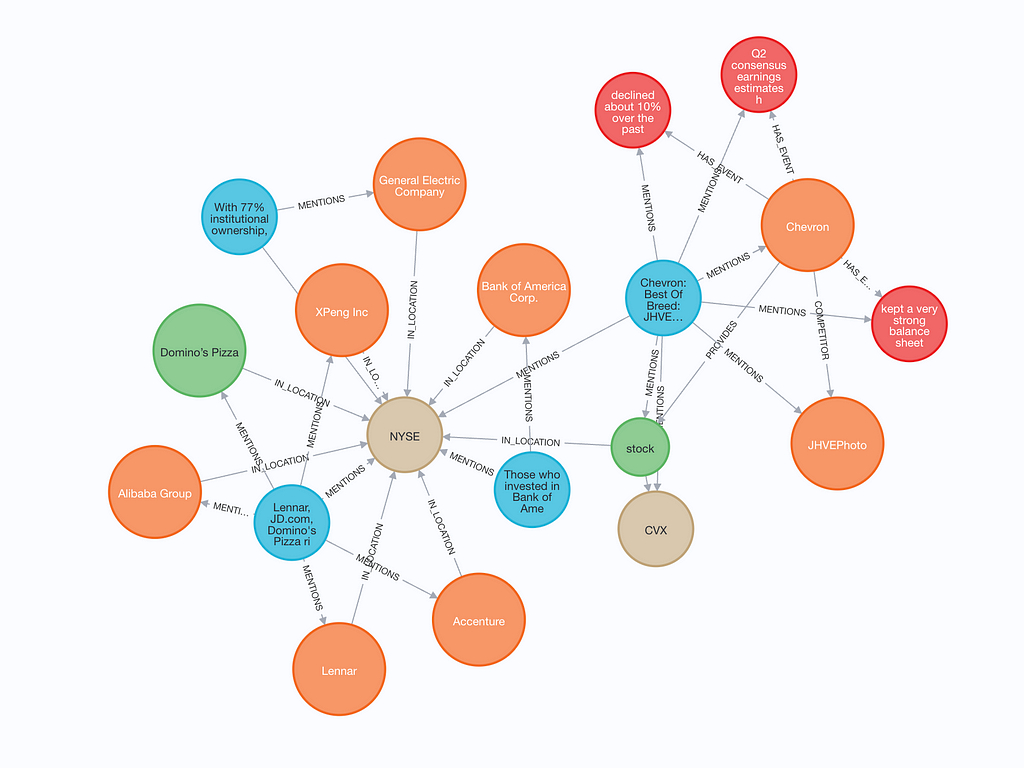
구성된 그래프에는 텍스트 청크(파란색)와 텍스트 및 `Vector Embedding`이 모두 포함돼요. 텍스트 청크에서 엔터티가 언급된 경우 텍스트 청크와 엔터티 사이에 MENTIONS `Relationship`이 있어요. 또한 엔터티는 다른 엔터티와 `Relationship`을 가질 수도 있답니다.
엔터티 중복 제거
엔터티 중복 제거, 즉 deduplication은 중요하지만 그래프 구성에서 종종 간과되는 단계에요. 쉽게 말해, 이는 단일 엔터티를 나타내는 여러 개의 Nodes를 찾아서, 더 나은 그래프 구조적 무결성을 위해 하나의 Node로 합치는 정리 작업이죠.
예를 들어, 구성된 그래프에서 병합할 수 있는 몇 가지 예시를 찾아봤어요.

잠재적인 중복을 찾기 위해 텍스트 임베딩 유사성과 단어 거리의 조합을 사용하는데요. 먼저 그래프의 항목에 대한 Vector Index를 정의해야겠죠?
graph_store.structured_query("""
CREATE VECTOR INDEX entity IF NOT EXISTS
FOR (m:`__Entity__`)
ON m.embedding
OPTIONS {indexConfig: {
 `vector.dimensions`: 1536,
 `vector.similarity_function`: 'cosine'
}}
""")
다음 Cypher 쿼리는 중복 항목을 찾는 쿼리인데, 꽤 복잡해요. 저와 Michael Hunger, Eric Monk가 완성하는 데 몇 시간이 걸렸답니다.
 similarity_threshold = 0.9
word_edit_distance = 5
data = graph_store.structured_query("""
MATCH (e:__Entity__)
CALL {
  WITH e
  CALL db.index.vector.queryNodes('entity', 10, e.embedding)
  YIELD node, score
  WITH node, score
  WHERE score > toFLoat($cutoff)
      AND (toLower(node.name) CONTAINS toLower(e.name) OR toLower(e.name) CONTAINS toLower(node.name)
           OR apoc.text.distance(toLower(node.name), toLower(e.name)) < $distance)
      AND labels(e) = labels(node)
  WITH node, score
  ORDER BY node.name
  RETURN collect(node) AS nodes
}
WITH distinct nodes
WHERE size(nodes) > 1
WITH collect([n in nodes | n.name]) AS results
UNWIND range(0, size(results)-1, 1) as index
WITH results, index, results[index] as result
WITH apoc.coll.sort(reduce(acc = result, index2 IN range(0, size(results)-1, 1) |
        CASE WHEN index <> index2 AND
            size(apoc.coll.intersection(acc, results[index2])) > 0
            THEN apoc.coll.union(acc, results[index2])
            ELSE acc
        END
)) as combinedResult
WITH distinct(combinedResult) as combinedResult
// extra filtering
WITH collect(combinedResult) as allCombinedResults
UNWIND range(0, size(allCombinedResults)-1, 1) as combinedResultIndex
WITH allCombinedResults[combinedResultIndex] as combinedResult, combinedResultIndex, allCombinedResults
WHERE NOT any(x IN range(0,size(allCombinedResults)-1,1)
    WHERE x <> combinedResultIndex
    AND apoc.coll.containsAll(allCombinedResults[x], combinedResult)
)
RETURN combinedResult
""", param_map={'cutoff': similarity_threshold, 'distance': word_edit_distance})
for row in data:
    print(row)
너무 깊게 들어가진 않을게요. 텍스트 임베딩과 단어 거리의 조합을 사용해서 그래프에서 잠재적인 중복 항목을 찾는다는 것만 알아두세요. similarity_threshold 와 word_distance를 튜닝해서 너무 많은 오탐 없이 중복 항목을 최대한 많이 찾아내는 최적의 조합을 찾아야 해요. 안타깝게도 엔터티 명확성은 완벽한 해결책이 없는 어려운 문제랍니다. 이 접근 방식을 사용하면 꽤 괜찮은 결과를 얻을 수 있지만, 오탐지도 있다는 점 잊지 마세요.
['1963 AFL Draft', '1963 NFL Draft']
['June 14, 2023', 'June 15 2023']
['BTC Halving', 'BTC Halving 2016', 'BTC Halving 2020', 'BTC Halving 2024', 'Bitcoin Halving', 'Bitcoin Halving 2024']
다이얼을 조정하고 중복 Nodes를 병합하기 전에 수동으로 예외를 추가하는 건 여러분의 몫이에요.
커스텀 리트리버 구현
우리는 뉴스 데이터 세트를 기반으로 Knowledge Graph를 구축했는데요. 이제 리트리버 옵션을 한번 살펴볼까요? 현재는 기존 리트리버 4개를 사용할 수 있어요.
- LLMSynonymRetriever는 쿼리를 받아서 키워드와 동의어를 생성해서 Nodes(그리고 해당 Nodes에 연결된 경로)를 검색하는 역할을 해요.
- VectorContextRetriever는 Vector Embedding 유사성을 기준으로 node를 검색하고, 해당 node에 연결된 path를 가져와요.
- TextToCypherRetriever는 Graph Database 스키마, query, 프롬프트 템플릿을 사용해서 Cypher query를 생성하고 실행하죠.
- CypherTemplateRetriever는 LLM이 Cypher 구문을 생성할 수 있는 자유도를 주는 대신, Cypher 템플릿을 제공하고 LLM이 매개변수를 채우도록 해요.
사용자 정의 retriever를 구현하는 것도 간단한데요, 여기서 그걸 한번 해볼 거예요. 사용자 정의 retriever는 먼저 입력 query에서 entity를 식별한 다음, 식별된 각 entity에 대해 별도로 VectorContextRetriever를 실행해요.
먼저 entity 추출 모델을 정의하고, 다음과 같은 메시지를 표시해볼게요.
 from pydantic import BaseModel
from typing import Optional, List


class Entities(BaseModel):
    """List of named entities in the text such as names of people, organizations, concepts, and locations"""
    names: Optional[List[str]]


prompt_template_entities = """
Extract all named entities such as names of people, organizations, concepts, and locations
from the following text:
{text}
"""
이제 사용자 정의 retriever 구현을 진행해볼까요?
from typing import Any, Optional

from llama_index.core.embeddings import BaseEmbedding
from llama_index.core.retrievers import CustomPGRetriever, VectorContextRetriever
from llama_index.core.vector_stores.types import VectorStore
from llama_index.program.openai import OpenAIPydanticProgram


class MyCustomRetriever(CustomPGRetriever):
    """Custom retriever with entity detection."""
    def init(
        self,
        ## vector context retriever params
        embed_model: Optional[BaseEmbedding] = None,
        vector_store: Optional[VectorStore] = None,
        similarity_top_k: int = 4,
        path_depth: int = 1,
        include_text: bool = True,
        **kwargs: Any,
    ) -> None:
        """Uses any kwargs passed in from class constructor."""
        self.entity_extraction = OpenAIPydanticProgram.from_defaults(
            output_cls=Entities, prompt_template_str=prompt_template_entities
        )
        self.vector_retriever = VectorContextRetriever(
            self.graph_store,
            include_text=self.include_text,
            embed_model=embed_model,
            similarity_top_k=similarity_top_k,
            path_depth=path_depth,
        )

    def custom_retrieve(self, query_str: str) -> str:
        """Define custom retriever with entity detection.

        Could return `str`, `TextNode`, `NodeWithScore`, or a list of those.
        """
        entities = self.entity_extraction(text=query_str).names
        result_nodes = []
        if entities:
            print(f"Detected entities: {entities}")
            for entity in entities:
                result_nodes.extend(self.vector_retriever.retrieve(entity))
        else:
            result_nodes.extend(self.vector_retriever.retrieve(query_str))
        final_text = "nn".join(
            [n.get_content(metadata_mode="llm") for n in result_nodes]
        )
        return final_text
MyCustomRetriever 클래스에는 두 가지 method만 있어요. init method를 사용해서 retriever에서 사용할 함수나 클래스를 instance화할 수 있죠. 이 예에서는 Vector Embedding 컨텍스트 retriever와 함께 entity 감지 OpenAI 프로그램을 instance화해요.
custom_retrieve method는 검색 중에 호출돼요. 사용자 정의 retriever 구현에서는 먼저 텍스트에서 관련 entity를 식별하죠. Entity가 발견되면 각 entity에 대해 Vector Embedding 컨텍스트 retriever를 반복하고 실행해요. 반면에 entity가 식별되지 않으면 전체 입력을 Vector Embedding 컨텍스트 retriever에 전달하고요.
보시다시피, 기존 retriever를 통합하거나 처음부터 시작해서 사용 사례에 맞게 retriever를 쉽게 사용자 정의할 수 있어요. structured_query Graph Database의 method를 사용하면 된답니다.
질의응답 흐름
예제 질문에 답하기 위해 사용자 정의 검색기를 사용하여 마무리해 볼게요. 우리는 리트리버를 RetrieverQueryEngine로 만들 거예요:
from llama_index.core.query_engine import RetrieverQueryEngine

custom_sub_retriever = MyCustomRetriever(
    index.property_graph_store,
    include_text=True,
    vector_store=index.vector_store,
    embed_model=embed_model
)

query_engine = RetrieverQueryEngine.from_args(
    index.as_retriever(sub_retrievers=[custom_sub_retriever]), llm=llm
)
테스트해 볼까요?
response = query_engine.query(
    "What do you know about Maliek Collins or Darragh O’Brien?"
)
print(str(response))
# Detected entities: ['Maliek Collins', "Darragh O'Brien"]
# Maliek Collins is a defensive tackle who has played for the Dallas Cowboys, Las Vegas Raiders, and Houston Texans. Recently, he signed a two-year contract extension with the Houston Texans worth $23 million, including a $20 million guarantee. This new deal represents a raise from his previous contract, where he earned $17 million with $8.5 million guaranteed. Collins is expected to be a key piece in the Texans' defensive line and fit well into their 4-3 alignment.
# Darragh O’Brien is the Minister for Housing and has been involved in the State’s industrial relations process and the Government. He was recently involved in a debate in the Dáil regarding the pay and working conditions of retained firefighters, which led to a heated exchange and almost resulted in the suspension of the session. O’Brien expressed confidence that the dispute could be resolved and encouraged unions to re-engage with the industrial relations process.
요약
이번 포스팅에서는 GraphRAG 정확도를 높이기 위해 엔터티 중복 제거 구현 및 사용자 지정 검색 방법 설계에 중점을 두고 LlamaIndex 내에서 Property Graph Index를 사용자 지정하는 과정을 살펴봤어요. Property Graph Index를 사용하면 다양한 그래프 생성자와 검색기를 사용하여 필요에 맞게 구현을 맞춤화할 수 있는 모듈식의 유연한 접근 방식이 가능하죠. 첫 번째 Knowledge Graph를 구축하든 고유한 데이터 세트에 맞게 최적화하든, 이러한 사용자 정의 가능한 구성 요소는 강력한 툴킷을 제공해 줄 거예요. Knowledge Graph 프로젝트를 어떻게 향상시킬 수 있는지 알아보기 위해 Property Graph Index 통합을 테스트해 보시는 걸 추천드려요.
언제나 그렇듯이 코드는 다음에서 사용할 수 있습니다..
- GraphRAG
- LlamaIndex
- Property Graph
에이치시스템즈의 LogTree는 Neo4j 기반 GraphRAG 플랫폼으로, 데이터를 자동으로 지식그래프화하고 자연어 질의로 즉시 답을 제공합니다.
'GraphRAG' 카테고리의 다른 글
| RAG 애플리케이션에서 텍스트 임베딩의 한계 (0) | 2026.05.31 |
|---|---|
| GraphQL API에 Retrieval-Augmented Generation (RAG)을 더하는 방법 (0) | 2026.05.31 |
| 인공지능과 Machine Learning의 현재와 미래 (0) | 2026.05.29 |
| Neo4j 대규모 지식 그래프에서 예측 분석: GraphRAG와 Machine Learning 활용 (1) | 2026.05.28 |
| 2023년 그래프 기술 전망: Neo4j와 GraphRAG의 미래는? (1) | 2026.05.28 |